Automated Error Monitoring for Your NGINX Service with Telegram Alerts
- Ctrl Man
- DevOps , Server Management
- 10 Oct, 2024
Automated Error Monitoring for Your NGINX Service with Telegram Alerts
Introduction
In today’s digital age, maintaining a robust and reliable web service is crucial for any business or organization. One of the key aspects of ensuring your web services run smoothly is continuous monitoring. This article will guide you through setting up an automated error monitoring system for your NGINX service running on Ubuntu, leveraging Telegram to receive real-time alerts.
Before we begin, it’s important to note that setting up Telegram alerts requires a few specific steps:
- Creating a Telegram bot
- Adding the bot to a chat or group
- Retrieving the correct Chat ID
Many tutorials simplify this process, but getting the correct Chat ID can be tricky. We’ll walk you through each step carefully to ensure your monitoring system works as intended.
Step 1: Create a Telegram Bot and Get Your Chat ID
-
Open Telegram and search for the BotFather (Telegram’s official: @BotFather).

-
Start a conversation with the BotFather, then type
/newbotto create a new bot. -
Follow the instructions to set up your bot, and you will receive an API token (e.g.,
123456789:ABCDEF1234ghIkl-zyx57W2v1u123ew11). Keep this token secure as it grants access to the bot. -
Add your bot to a Telegram group or chat where you want to receive alerts.
-
Send a message to your bot from the chat or group.
-
Retrieve your Chat ID by calling the following URL:
https://api.telegram.org/bot<YourBotToken>/getUpdatesThe response should look like this:
{ "ok": true, "result": [ { "update_id": 123456789, "message": { "message_id": 1, "from": { "id": 12345, "first_name": "John", "username": "john_doe" }, "chat": { "id": -100123456789, // This is your Chat ID "title": "Group Name", "type": "group" }, "date": 1677777777, "text": "Hello, bot!" } } ] }- The Chat ID is found in
result[0].message.chat.id. - For private chats, the Chat ID will match the user’s ID. For groups, it usually starts with
-100.
- The Chat ID is found in
-
If you do not see any results, ensure you’ve interacted with the bot by sending a message, then call the
getUpdatesURL again. If you still don’t see an update, use the following URL to specify the query:https://api.telegram.org/bot<YourBOTToken>/getUpdates?offset=0&limit=1&timeout=0Note: Updates are stored for only 24 hours, so you may need to send a new message to generate an update.
Step 2: Create the Script Using the Nano Editor
-
Open your terminal.
-
Run the following command to create and open the script in the
nanoeditor:sudo nano /usr/local/bin/nginx_monitor.sh -
In the nano editor, paste the following script:
#!/bin/bash

# Replace with your Telegram bot token and chat ID
BOT_TOKEN="<your-telegram-bot-token>"
CHAT_ID="<your-telegram-chat-id>"

send_telegram_message() {
  local message="$1"
  curl -s -X POST "https://api.telegram.org/bot$BOT_TOKEN/sendMessage" \
    -d chat_id="$CHAT_ID" \
    -d text="$message" \
    -d parse_mode="HTML"
}

process_log_line() {
  local line="$1"
  if echo "$line" | grep -q "nginx"; then
    if echo "$line" | grep -q "emerg\|crit\|alert\|err"; then
      local timestamp=$(echo "$line" | awk '{print $1, $2}')
      local error_msg=$(echo "$line" | grep -oP 'nginx.*')

      local message="⚠️  <b>NGINX Error Alert</b> ⚠️
<b>Time:</b> $timestamp
<b>Message:</b> $error_msg"

      send_telegram_message "$message"
    fi
  fi
}

# Monitor NGINX log (access.log or error.log)
tail -F /var/log/nginx/error.log | while read -r line; do
  process_log_line "$line"
done
Step 3: Make the Script Executable
-
Save the script and exit your text editor.
-
Run:
chmod +x nginx-monitor.sh
Step 4: Test the Script
Before setting up the script automatically, test it manually to ensure everything works:
To run your nginx-monitor.sh script in the background in silent mode and ensure it starts automatically on every reboot, follow these steps:
1. Run the Script in the Background (Silent Mode)
You can use the following command to run the script in silent mode (no output in the terminal) and send it to the background.
nohup /usr/local/bin/nginx-monitor.sh >/dev/null 2>&1 &
Explanation:
nohup: Prevents the process from being terminated when the session ends./usr/local/bin/nginx-monitor.sh: Path to your script.>/dev/null 2>&1: Redirects both output and error messages to/dev/null, effectively silencing the script.&: Runs the command in the background.
2. Automatically Start the Script on Every Reboot
To ensure your script runs automatically after a reboot, you can create a systemd service or add it to your crontab.
Option 1: Using systemd (Recommended)
-
Create a systemd service file: Create a new service file for your script in
/etc/systemd/system/.sudo nano /etc/systemd/system/nginx-monitor.service -
Add the following content to the service file:
[Unit] Description=NGINX Monitor Script After=network.target [Service] ExecStart=/usr/local/bin/nginx-monitor.sh Restart=always [Install] WantedBy=multi-user.target -
Enable and start the service: Run the following commands to enable the service so it starts on boot and to start it immediately:
sudo systemctl enable nginx-monitor.service
sudo systemctl start nginx-monitor.service
Option 2: Using cron
-
Open the crontab editor:
crontab -e -
Add the following line to run the script on reboot:
@reboot nohup /usr/local/bin/nginx-monitor.sh >/dev/null 2>&1 &
This will run the script in silent mode every time the system reboots.
Summary
- To run the script in silent mode and in the background:
nohup /usr/local/bin/nginx-monitor.sh >/dev/null 2>&1 &. - To run it automatically on every reboot:
- Use
systemd(preferred method for managing services). - Alternatively, add the command to your
crontabwith@reboot.
- Use
-
Manually Add a Test Error
Instead of modifying the Nginx configuration, you can create a test error entry directly in the Nginx error log with the following command:echo "nginx: test error" | sudo tee -a /var/log/nginx/error.logThis simulates an error and should trigger the alert functionality of your
nginx-monitorscript.

-
Monitor the Nginx Error Log
Open a new terminal window and run the following command to monitor the Nginx error log in real time:tail -f /var/log/nginx/error.logYou should see the test error entry appear in the log.
-
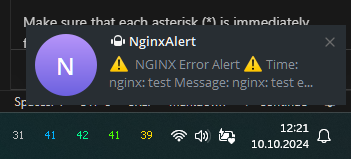
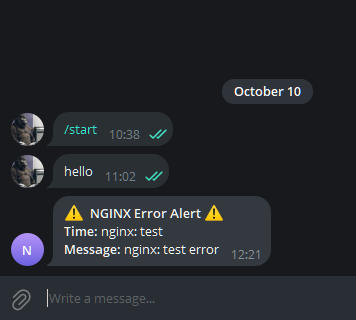
Check Telegram for Alerts
Check your Telegram messages to see if you received an alert from yournginx-monitorscript regarding the test error.

This method allows you to test your monitoring setup without disrupting Nginx functionality, ensuring that your server remains operational while you verify the alerting mechanism.
Step 5: Automate the Script with systemd
- Create a systemd service file for your script, saving it as
/etc/systemd/system/nginx-monitor.service:
[Unit]
Description=NGINX Monitor Script
After=network.target

[Service]
ExecStart=/usr/local/bin/nginx-monitor.sh
StandardOutput=append:/var/log/nginx-monitor.log
StandardError=append:/var/log/nginx-monitor-error.log
Restart=always
User=root

[Install]
WantedBy=multi-user.target
-
Save the file and reload systemd:
sudo systemctl daemon-reload -
Enable and start the service:
sudo systemctl enable nginx-monitor.service
sudo systemctl start nginx-monitor.service
Step 6: Monitor and Manage the Service
-
Check the status of your monitoring service:
sudo systemctl status nginx-monitor.service -
Stop or restart the service as needed:
sudo systemctl stop nginx-monitor.service
sudo systemctl restart nginx-monitor.service
Step 7: (Optional) Monitoring NGINX Service Status
If you also want to be notified when your NGINX service stops, add this function to your main script:
check_nginx_status() {
  if ! systemctl is-active --quiet nginx; then
    local message="⚠️  <b>NGINX Service Down</b> ⚠️
The NGINX service is not running!"

    send_telegram_message "$message"
  fi
}

# Check NGINX status every 1 minute
while true; do
  check_nginx_status
  sleep 60
done
General Improvements
Troubleshooting
- Permissions: Ensure the script is run with minimal necessary permissions.
- Log Rotation: Mention how log rotation might affect monitoring and suggest configuring logs to be rotated periodically.
Security Considerations
- Run the script with minimal necessary permissions to prevent unauthorized access.
Customization
- Alert Messages: Users can customize the alert messages or adjust the monitoring sensitivity by modifying the
send_telegram_messagefunction. - Error Handling: Add error handling for the curl command in case the Telegram API is unreachable. Example:
if ! curl -s -X POST "https://api.telegram.org/bot$BOT_TOKEN/sendMessage" \
  -d chat_id="$CHAT_ID" \
  -d text="$message" \
  -d parse_mode="HTML" > /dev/null; then
  echo "Failed to send Telegram message. Check your bot token and network connection."
fi
FAQ
- How much data does this solution use? This solution primarily uses the bandwidth required for the Telegram API calls, which are minimal.
- Can I monitor multiple NGINX instances with one script? Yes, you can modify the script to log from multiple NGINX instances by adjusting the
tailcommand or adding additionaltail -Fcommands for different logs. - How can I adjust the script to monitor specific types of errors? Modify the
process_log_linefunction to include more error levels (e.g., “notice”) and add specific error messages as needed.
Conclusion
With these steps, you have successfully set up an automated error monitoring system for your NGINX service on Ubuntu using Telegram alerts. This ensures that any errors or unexpected behavior in your logs are immediately notified to you, helping you maintain a reliable and efficient web service.


